
How to Configure Full Page Cache / Varnish Cache
With a big catalog of 234+ extensions for your online store
Configure Full Page Cache Magento 2 - The cache management system that will help you improve the performance of your site better and better. In addition, the Magento system will auto-show a notice at the top of the workplace if it is time to refresh the cache. Just follow the Cache Management link and flush the invalid caches.
By default, Magento 2 provides the full page cache on the server to optimize the display of various pages such as category pages, product pages, and CMS pages. By enabling the full page cache, you can make response time on your store faster as well as reduce the customer’s waiting time to reload the server; otherwise, a fully-generated page can be read directly from the cache. Customers’ experience will be improved and you can increase conversion rates at once.
Please follow this tutorial to configure the full-page cache from Magento 2 configuration.
How To configure the Full Page Cache in Magento 2
- On the Admin panel, click
Stores. In theSettingssection, selectConfiguration. - Select
SystemunderAdvancedin the panel on the left - Open the
Full Page Cachesection, and continue with following:

- In the
Caching Applicationfield, select one of the following
* Built-in Application
* Varnish Caching
- In the
TTL for public contentfield, set the time-out for the page cache. The default value is 86400
How to Configure Vanish Cache
- If you choose
Varnishoption in theCaching Applicationfield, complete theVarnish Configurationsection as following instruction:
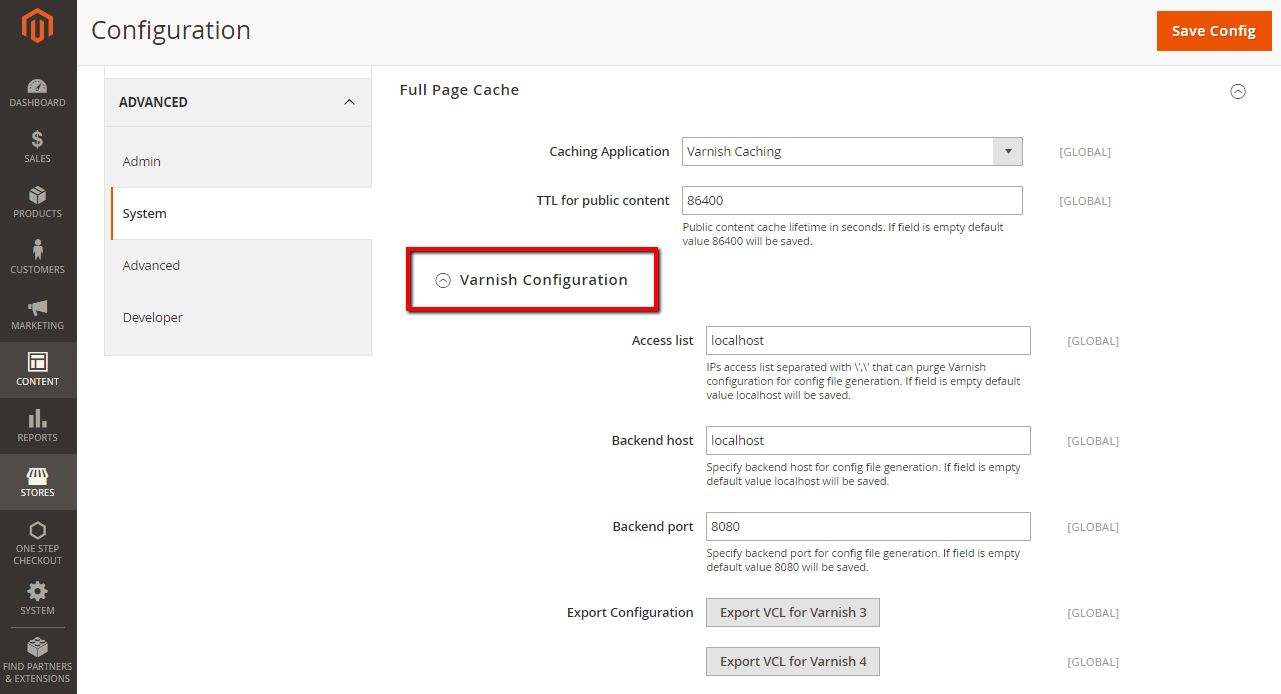
- In the
Access listfield, enter the IP addresses, IPs access list separated with ',' that can purge Varnish configuration for config file generation. If field is empty default valuelocalhostwill be saved. - In the
Backend hostfield, enter the IP address of the backend host that generates config files. The default value islocalhost - In the
Backend portfield, identify the backend port that is used to generate config files. The default value is:8080 - In the Export Configuration field, click the button for the the version of Varnish that you use.
* Export VCL for Varnish 3
* Export VCL for Varnish 3
- When complete, click
Save Config
The bottom line
Full Cache page allows pages to be rendered faster, which improves load speed and response time of your website, enhancing customers’ experience considerably. After following these instructions, I believe you can configure Full Page Cache or Varnish Cache in Magento 2 easily. If you still have doubts, please write your concerns in the comment box.
Related topics
Looking for
Customization & Development Services?
8+ years of experiences in e-commerce & Magento has prepared us for any challenges, so that we can lead you to your success.
Get free consultant
Recent Tutorials

Change Store Email Addresses


Magento 2 Search Settings: Default Magento vs Mageplaza AJAX Search
Explore Our Products:
People also searched for
- Configure Full Page Cache Magento 2
- magento 2 enable full page cache
- magento 2 full page cache
- full page cache magento 2
- fpc magento 2
- enable full page cache magento 2
- magento 2 fpc
- magento 2 cache configuration is invalid
- magento page cache
- magento 2 full page cache not working
- magento full page cache
- full page cache magento
- magento 2 enable cache
- magento fpc
- magento varnish
- magento 2 disable full page cache
- disable full page cache magento 2
- configure full page cache magento 2
- how to enable cache in magento 2
- magento 2 full page cache invalidated
- magento enable cache
- magento cache settings
- varnish configuration magento 2
- 2.2.x, 2.3.x, 2.4.x
Stay in the know
Get special offers on the latest news from Mageplaza.
Earn $10 in reward now!


