
How to Create a Product Attribute in Magento 2
With a big catalog of 234+ extensions for your online store
Product Attribute is the characteristics of the products that your customers will consider to see if that item fits their needs or not, such as the size of a shirt or the color of a bag, etc. As a Magento 2 store owner, you should know how to create a Product Attribute in order to provide essential product information, classify items strategically, and speed up customers’ decision making process. In this post, let’s find out what the product attribute is, and how to create one. You can follow this how to create product attributes programmatically post as well.
Discover how to create Product Attribute Sets in Magento 2
What is the product attribute?
The attributes which are the block of a product in a catalog which enable customers to point to the existing characteristics of your product. You are allowed to create as many attributes as you need for a product in Magento 2 configuration. Each attribute will approve only one type of input that you will assign in the settings. Beside giving additional information of the product, the attributes are also used as search parameters and criteria to filter in layered navigation M2, product comparison reports, and promotions.
The product attributes can be created from the Stores menu or the Product Detail page where you are working with the product.
Read how to update product attributes in bulk
5 Steps to Create a Product Attribute in Magento 2
Please follow all these steps with detailed guides to create a Product Attribute:
- Step 1: Create a New Attribute
- Step 2: Complete the Basic Properties
- Step 3: Complete the Advanced Properties
- Step 4: Insert the Field Label
- Step 5: Complete the Storefront Properties
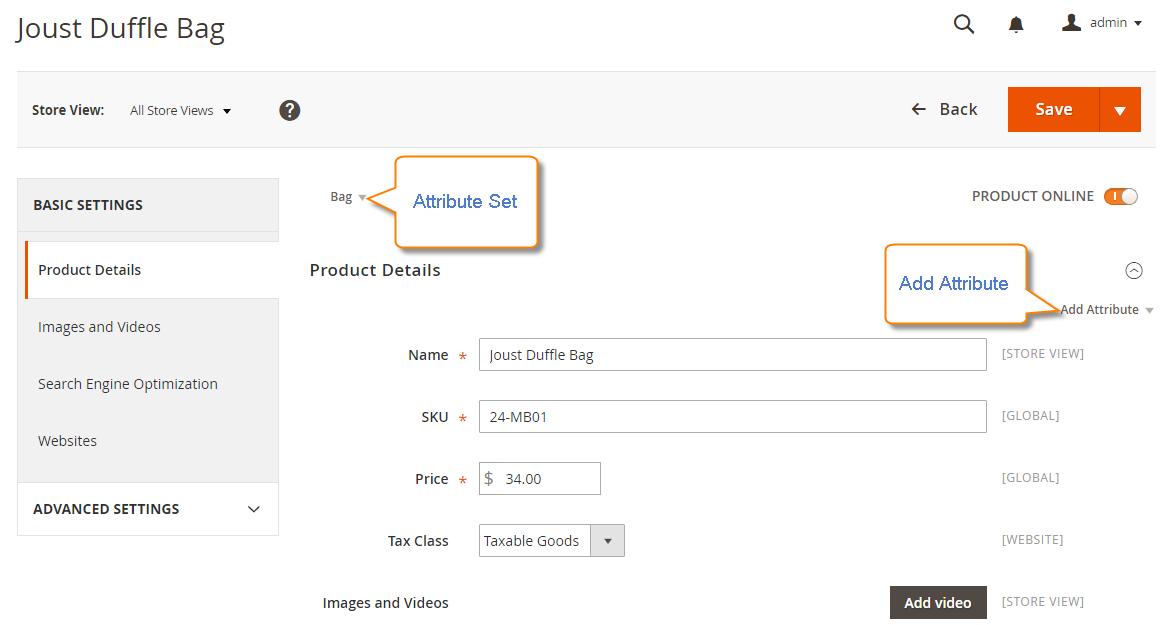
Step 1: Create a New Attribute
- On the Admin Panel,
Product > Inventory > Catalog, click onEditlink on the Product Detail page, then click onAdd Attribute.
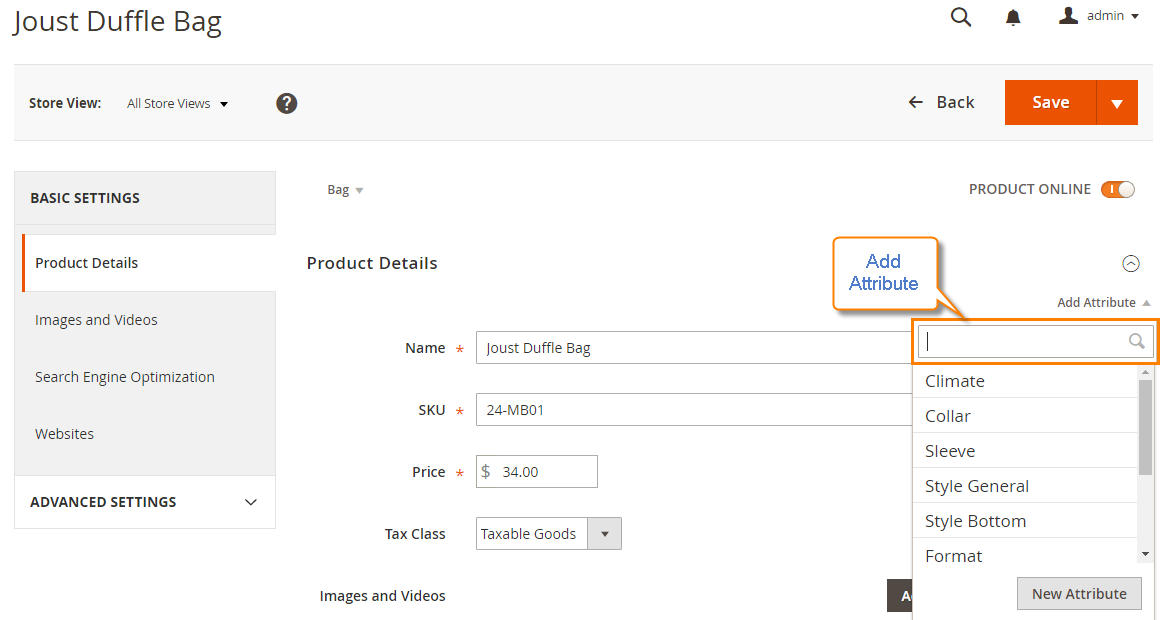
- If you want to use an existing attribute, type the name of the needed attribute into the search box to find it or hit the search box and select the needed one from the dropdown list.
-
If you want to use a new attribute for the product, just click the
New Attributeand move to the next steps.You can also go to the New Attribute page by doing the following: On the Admin Panel,
Store > Attributes > Product, the click theAdd New Attribute
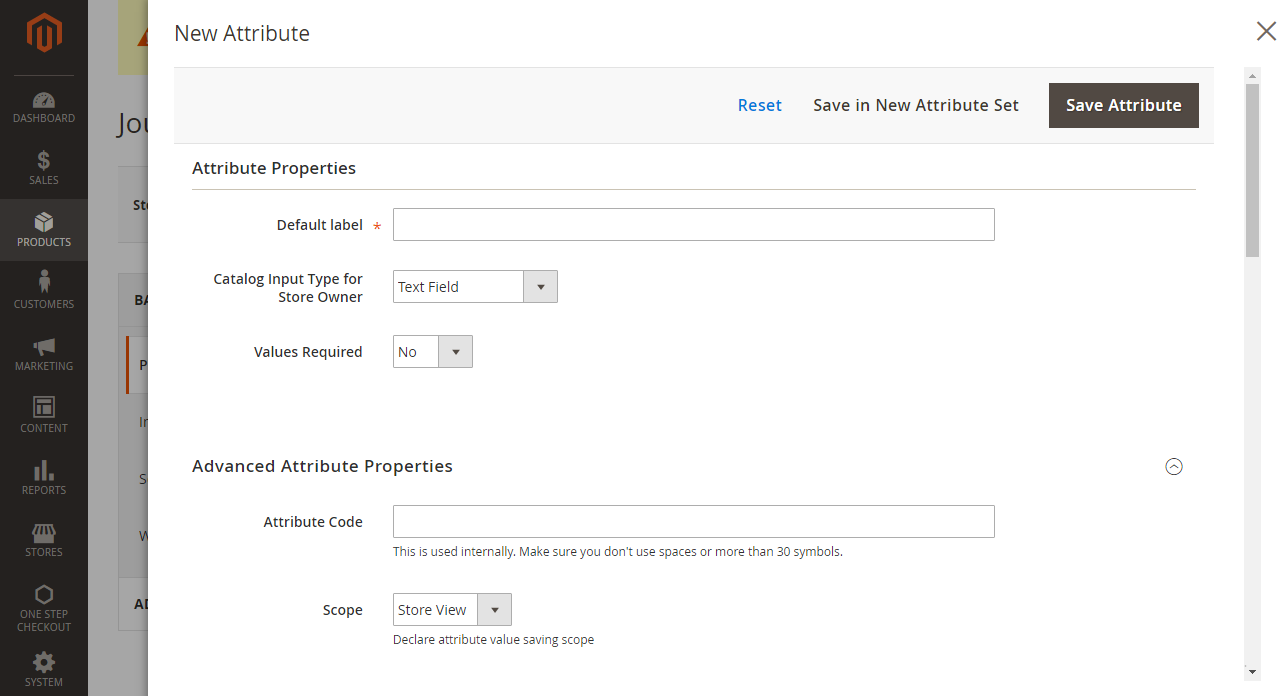
Step 2: Complete the Basic Properties
In this step, you are going to fill in the Basic Properties of a product attribute.

- Insert the
Default Labelto describe the attribute. - In the
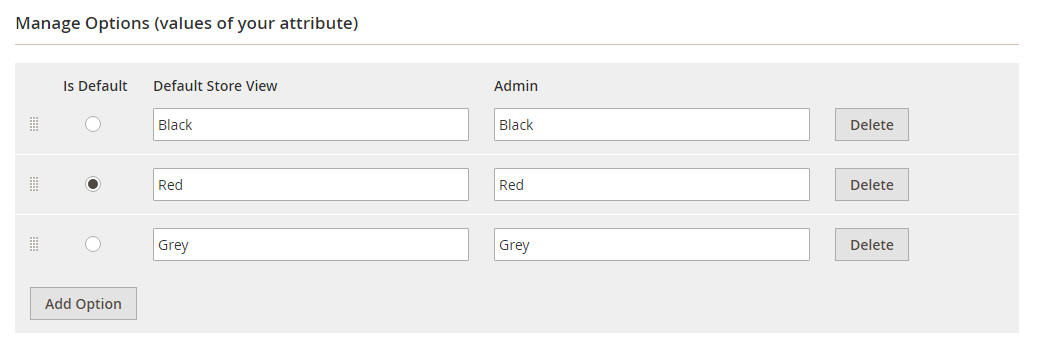
Catalog Input Type for Store Owner, choose the type of the input from a list. - For Dropdown and Multiple Select, you need to add options for them.
- Under Manage Options, click the
Add option. - Name for the first value that is shown in the list, simultaneously, you can name for the value under Admin and different values for each store view when you have multiple store views. If there is only one store view, the Admin value is auto-applied for the storefront.
- Click
Add Optionand do the above guides again for the next options. - Mark the
Is Defaultcheckbox if you want to use it as the default.
- Under Manage Options, click the
- Choose Yes for the
Value Requiredto ask customers to select the options before purchasing.
Step 3: Complete the Advanced Properties (Optional)
The Advanced Properties include extra details of the attribute, so this step is optional.
- Insert the
Attribute Codethat is less than 30 characters and excluded spaces.

- The
Scopeincludes Store View, Website, and Global.You will choose one of three places in your store system where the appearance of attribute is approved. - Apply the
Unique Valueif you do not want to share it with other products. - Choose the type of data that is filled into a text field from a list of the
Input Validation for Store Owner. The following input types are valid:- Decimal Number
- Integer Number
- URL
- Letters
- Letters (a-z,A-Z) or Number (0-9)

Step 4: Insert the Field Label
Adding Field Label will help you find and manage the attributes more easily:
- Open the
Manage Titlesection. - Insert the
Titlethat is shown for the field label. In case of multiple languages supported on your store, insert the translation of the title for each view.

Step 5: Complete the Storefront Properties
Now, you need to set up the details in Storefront Properties to decide how the attribute is shown in the frontend:
- Look down the
Store Properties.
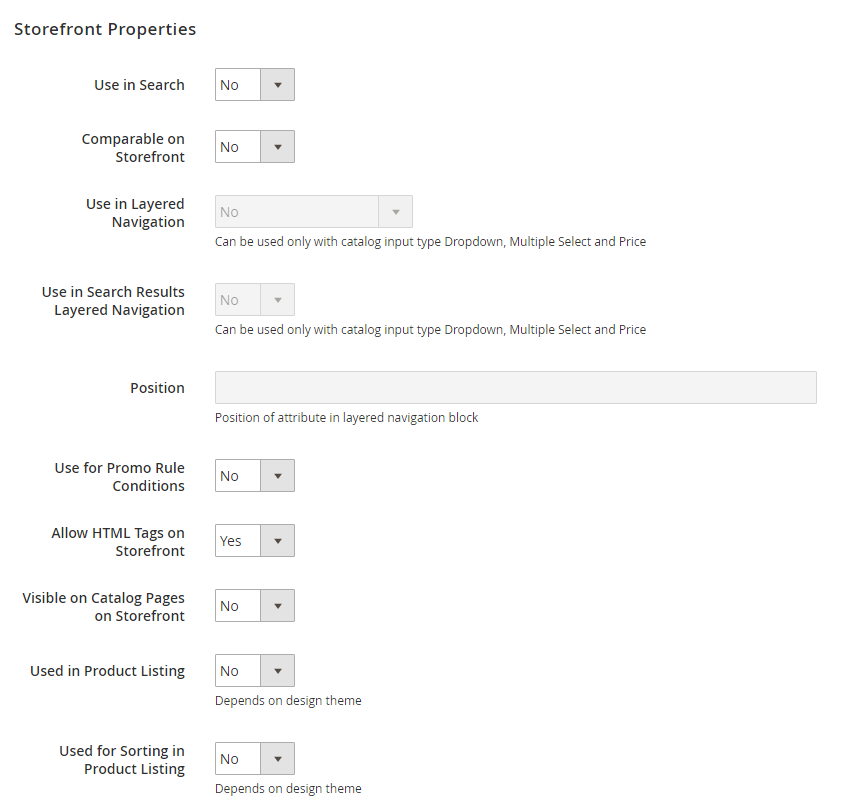
- Choose Yes for the
Use in Searchto be ready for searching the attribute. - Allow comparing the product attributes in Product Compare if you choose Yes in the
Comparable on Storefrontfield. - If the catalog input field is Dropdown, Multiple Select or Price, you can do the following:
- Allow filtering the attribute in the Layered Navigation if you set Yes for the
Use in Layered Navigation. - Show the attribute in layered navigation on the search result page if you set Yes for
Use in Search Results Layered Navigation. - Set the
Positionof the attribute in the layered navigation block.
- Allow filtering the attribute in the Layered Navigation if you set Yes for the
- Choose Yes in the
Use for Promo Rule Conditionsfield to apply the product attribute for the price rules. - Enable HTML format for the text when you set Yes for
Allow HTML Tags to Frontendand the WYSIWYG editor is ready to edit the text all time. - To make the attribute visible in catalog page listing, choose Yes in the
Visible on Catalog Pages on Storefrontfield. - If Product Listing is supported at your store, the attribute can be appeared and be used as sort parameter. Configuring that from the
Used in Product ListingandUsed for Sorting in Product Listingfield. Save Attributeto finish all.
Check this product filtering solution - Layered Navigation now!
Input Type Description
In the settings progress of creating the new product attribute, there are many input types you need to assign directly to the attribute fields such as Text Field, Dropdown, or Yes/No. The input types will specify the type of data that is inserted into the fields, the format of the fields and input control. All attribute fields take a responsibility to give more details about your products and it is required for the customers to complete them before purchasing if needed.
Text Field: The field supports text type with only one line.Text Area: The text area is the text field with multiple lines in it. It allows a paragraph such as product description. For the text area, the WYSIWYG Editor is available to format with HTML tags, or insert tags directly into the text.Date: The Date value can be entered directly or selected from the dropdown list or click on the Calendar icon that depend on your purpose.Yes/No: The field includes 2 options: Yes and No in the dropdown.Dropdown: Dropdown allows listing all values for the field at the same time and accepts only one value.Multiple Select: Many values will be accepted at the same time in the field. All values appear in the dropdown.Price: Price value is set for the price field of the product. You can also use the Price value for Special Price, Tier Price or Cost field. The currency is based on your configuration.Media Image: The images of the attribute in the Media Image field will link to an additional image of the product with Base, Small, and Thumbnail although the thumbnail gallery will not include the media image.Fixed Product Tax: Give the fixed number for FPT rateVisual Swatch: The visual swatches can describe the true color, texture, or pattern with a hexadecimal color value, or an image.Text Swatch: A text swatch is like a button that is used for an attribute value as size.
The bottom line
Product attributes play an essential role in how you manage your inventories and how customers can navigate in the product search process. That is why this tutorial on how to create product attributes in Magento 2 will be helpful for online stores like you. We understand that you may find it hard to identify and set up certain attributes, so please leave comments for our help. When you are done with creating product attributes, we attach the category-related topics that you may love to read.
Related Post
Looking for
Customization & Development Services?
8+ years of experiences in e-commerce & Magento has prepared us for any challenges, so that we can lead you to your success.
Get free consultant
Recent Tutorials

Change Store Email Addresses


Magento 2 Search Settings: Default Magento vs Mageplaza AJAX Search
Explore Our Products:
People also searched for
- how to add product attribute in magento
- create attribute magento 2
- add product attribute magento 2
- create attribute in magento 2
- how to add attribute in magento 2
- magento create attribute
- magento 2 product attributes
- create new attribute magento 2
- create product attribute magento 2
- magento 2 attribute input types
- how to add product attribute in magento 2
- magento 2 attribute types
- product attributes magento 2
- attributes magento 2
- magento create product attribute
- magento 2 product attribute
- magento 2 add attribute
- magento add product attribute
- add attribute in magento 2
- magento 2 add new product attribute
- product attributes in magento 2
- magento attribute types
- magento 2 add attribute to product
- catalog input type for store owner magento 2
- add attribute magento 2
- create custom attribute in magento 2
- add attribute product magento 2
- magento 2 dependent attributes
- magento product attributes
- magento attributes
- 2.2.x, 2.3.x, 2.4.x
Stay in the know
Get special offers on the latest news from Mageplaza.
Earn $10 in reward now!


